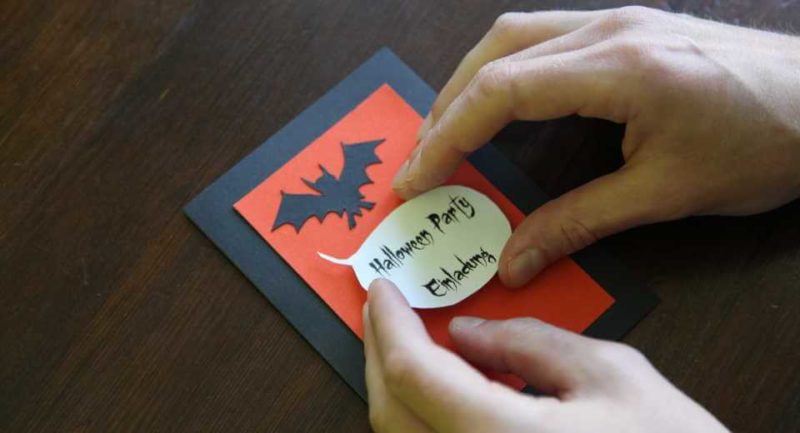
For these bat Halloween card you need only colored clay paper and plastic insects. This is how you do it yourself!
The most beautiful Halloween cards are self-made. And the more time you put in, the more impressive results you get, no question. However, you do not always have them. Nevertheless, you can craft your own bat Halloween card with children quickly.
Have fun with tinkering!
Easy DIY Bat Halloween Card
Duration: for the first card about 30 min., then about 5 min. per additional card.
What You Need*
- Bat template
- Printed invitation text in appropriate font (e.g. Gypsy Curse, 33 pt)
- Black clay paper, 130mg
- Orange clay paper, 130mg
- White paper
- Decorative plastic flies
- Scissors
- Pencil
- Set square / ruler
- glue stick / paper glue
- hot glue gun / all purpose glue
How to Craft This Bat Halloween Card
1. Cut the Clay Cardboard and Glue It
On the black clay cardstock, draw the dimensions of your card with a fine pencil. For the fold-out card, measure a 14.5 cm x 9.5 cm rectangle using a set square. Then cut it out and fold it exactly in the middle of the long side to form a card.
Next, cut a rectangle from the orange cardstock that measures 12.5 cm by 7.5 cm. Glue this to the center of the front of the card using paper glue.
2. Print Out the Bat Template and Your Text
Download here the bat template, print it out and cut out the bat as accurately as possible. Now you can use it as a template.
Tip: Print the template best on thick paper.
Write your desired text for the front in a suitable font, we have chosen in the example Gypsy Curse in size 33 pt.
By the way, on this page you can find many free Halloween fonts for download. If you choose a different font, make sure when you print out the text that it is the right size for your card.
Tip: If you’re not sure, scale your text document on screen to exactly the size of an A4 sheet of paper by holding it next to it. This way you can see exactly how big the font can be.
3. Cut Out the Bat and Speech Bubble for Your Bat Halloween Card
Place the bat template on the black cardstock, outline it with a fine pencil, and cut it out. If you’re making several cards of the same kind, do it the same number of times.
Cut out the printed text in the form of a speech bubble.
4. Glue Everything In Place

Now you just have to glue everything on. For the bat and the speech bubble, use standard paper glue. We glued on the plastic flies with a hot glue gun. But all-purpose glue works just as well.
Have fun crafting your bat halloween card and have a wonderfully horrifying Halloween party!
Looking for more complex, or just different ideas for Halloween invitation cards? We have 5 more craft instructions up our sleeve: with dead skull, as surprise pumpkin, flying witch, witch cauldron or with glowing ghosts.
Let’s also take a look at our other Halloween ideas or our tips for activities with kids.
To never miss any future ideas from Greatime, just follow us on Facebook and Instagram and / or subscribe to our newsletter!
*In this article there are so-called affiliate links. This means that if you order a product through one of these product links, Greatime may get a small commission without making the product more expensive for the buyer.

![Bat Halloween Card Easy Halloween Diy For Kids Tutorial [Uber En="Simple*DIY*idea*for*a*bat*Halloween*card" De="Einfache*Bastelidee*für*eine*Halloween*Einladungskarte*mit*einer*Fledermaus"]](https://greatime.de/wp-content/uploads/2018/10/halloween-einladungskarten-fledermaus-1.jpg)
![Uber En Quot Spooky Party Quot De Quot Gruselparty Quot [Uber En="A*spooky*party*for*children,*whether*for*Halloween*or*as*a*children's*birthday*party,*is*guaranteed*to*inspire*children." De="Eine*Gruselparty*für*Kinder*ob*zu*Halloween*oder*als*Kindergeburtstag,*begeistert*Kinder*garantiert."]](https://greatime.de/wp-content/uploads/2017/10/halloween-spiele-fuer-kinder-5.jpg)
![Uber En Quot Halloween Games For Adults Quot De Quot Halloween Spiele F R Erwachsene Quot [Uber En="Halloween*games*for*adults*are*the*highlight*of*a*Halloween*party" De="Halloween-Spiele*für*Erwachsene*sind*das*Highlight*einer*Halloweenparty"]](https://greatime.de/wp-content/uploads/2017/09/pexels-photo-235966.jpeg)
![Uber En Quot Hot Air Balloon Gift Craft Quot De Quot Hei Luftballon Geldgeschenk Quot [Uber En="Free*tutorial*for*how*to*make**a*Hot*Air*Balloon*Gift" De="Kostenlose*Anleitung*zum*Heißluftballon*Geldgeschenk*basteln"]](https://greatime.de/wp-content/uploads/2022/06/heissluftballon-geschenk.jpg)