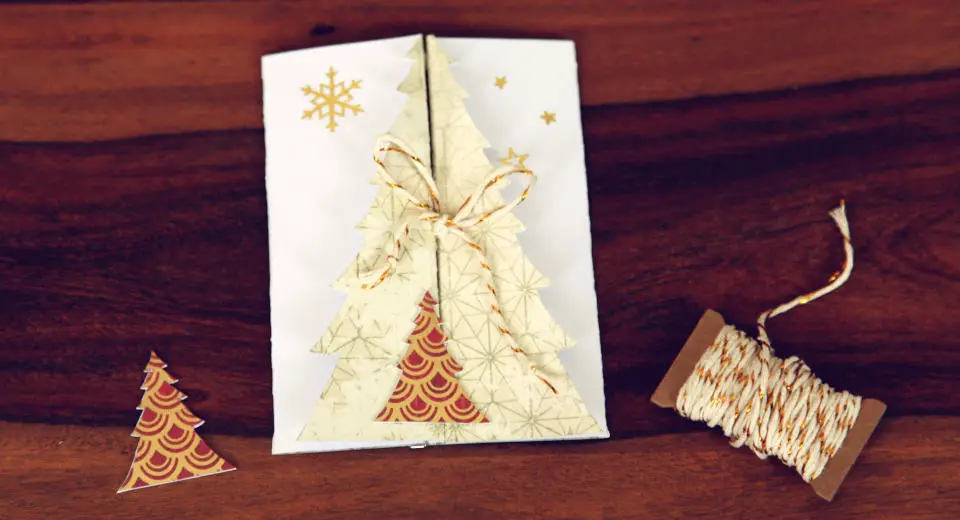
A fir tree is a wonderful motif for the Christmas greeting. With this template you can easily craft a beautiful Christmas card for your loved ones that is special. This is how to make a Christmas tree card with a surprise inside.
Do you also feel that at some point during Advent towards Christmas, time suddenly goes into overdrive? Buying Christmas presents, finding a nice little something for your colleagues, the Christmas parties and Christmas markets, baking biscuits – and you also wanted to make a nice Christmas card. With a very special Christmas greeting for all your loved ones. At least that’s how I feel every year and I actually started to get organised with a To Do List for Christmas. 😀
This year I managed to make a beautiful Christmas tree card with a fir tree as the motif, which magically doubles when you open the card. The inside of the card is also designed, just like an auspicious gift, you first pull the bow that closes it and it reveals the precious inside. You can easily make a copy of this Christmas tree card in about 20 minutes, provided you have all the craft materials at home. Simply print out the template, cut it out and use it as a template. I’ve listed everything else you need on the materials list*.
Christmas is all about crafting for me! If you’re looking for inspiration for creative and original Christmas ideas, keep checking back.
How to Make a Christmas Tree Card

Paint it on, cut it out, stick it on – with the templates, the crafting is quick
Time: 20 minutes
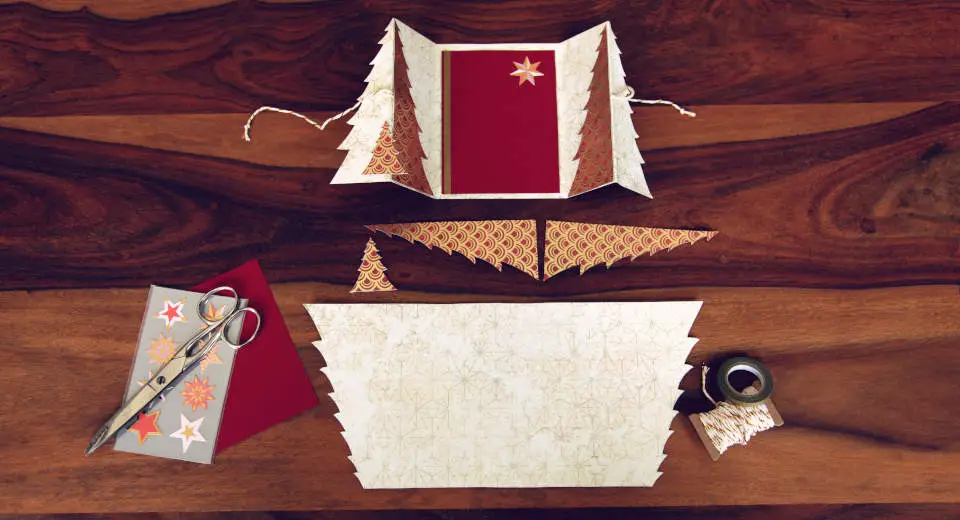
Cards with an “aha” effect put you in a good mood. For this reason alone, it’s also worth designing the inside of the Christmas tree card. On the template you’ll find all the Christmas tree parts I’ve designed and you can simply use them as a template.
Material List*
- Motif paper, I used The Far East
- Dark red clay paper
- Paper Poetry star stickers
- Relief stickers starsand snowflakes
- Washi Tape, 5 mm gold
- Gold white baker’s twine
- Template for the Christmas tree card
- Set square
- Pencil
- Scissors
- Glue stick
- Hot glue gun
How to Craft a Christmas Card With 2 Fir Trees

- First print out the templates for the card and cut them out.
- Choose the paper you want to use for the card. I recommend you to choose classic colour combinations like gold-red, green-gold or blue-silver with ornamental patterns.
- Use the cut-out template for the card as a stencil and trace around the outline on the front of the design paper. Don’t forget to mark the dotted 4 folds at the top and bottom with a small line. Place the triangle at a right angle between the two dotted lines and fold one edge forward along it. Bend the inside folds inwards and the outside folds outwards.
- Now cut out the Christmas card and crease it nicely to shape.
- Paint the small fir tree once on each of the two chosen motif papers, cut them out, stick them together and hot-glue them to the front of the Christmas card.
- Adorn the card in the sky with golden relief stickers, for example snowflakes and stars
Design the Inside of the Christmas Tree Card With 3 Fir Trees and a Star

The inside of the card is the real eye catcher
- Cut 2 pieces of the golden baker’s twine about 14 cm long
- Draw the half fir trees on the second motif cardboard you have chosen, cut them out.
- Glue 2 cm of baker’s twine centrally under each half of the Christmas tree and glue the fir trees flush to the right and left of the folds, so that a two-coloured fir tree is formed when the card is opened.
- Using a triangle, draw a 9 x 12 cm rectangle on the matching coloured paper (dark red in my case), cut it open and stick it in the centre of the card.
- I decorated the paper on which you write your Christmas greeting with a poinsettia on the top right and a border of thin golden Washi Tape on the left.
- Once you have written on the card, fold it over and close it with the two ends of baker’s twine with a bow.
This is how quickly you can make a beautiful Christmas card with a fir tree!
Are you always looking for special ideas for your free time? On Greatime you can discover simple crafting ideas for many occasions and many more tips for leisure activities with friends, family and as a couple.
Never miss a good idea again! Follow Greatime on Facebook and on Instagram!
*In this article there are so-called affiliate links. This means that when you buy a product through such a link, Greatime receives a small commission. However, you do not pay more.

![How To Make A Christmas Tree Card Tutorial [Uber En="How*to*make*a*Christmas*tree*card*with*fir*tree*to*fold*out" De="Schöne*Weihnachtskarte*mit*Tannenbaum*zum*aufklappen"]](https://greatime.de/wp-content/uploads/2021/12/schoene-weihnachtskarte-basteln-tannenbaum.jpg)
![Uber En Quot 18th Birthday Present Quot De Quot Geschenk Zum 18 Geburtstag Quot [Uber En="How*to*craft*a18th*Birthday*Money*Gift" De="Geldgeschenk*zum*18.*Geburtstag*-*selbst*gebastelt"]](https://greatime.de/wp-content/uploads/2020/03/geldgeschenk-zum-18-geburtstag-4.jpg)
![Uber En Quot Chick Quot De Quot K Ken Quot [Uber En="This*is*how*to*make*a*Easter*chick*as*decoration" De="Ein*Küken*basteln*als*Osterdeko*geht*einfach*mit*dieser*Anleitung"]](https://greatime.de/wp-content/uploads/2018/03/osterdeko-selber-machen-kueken.jpg)
![Uber En Quot Christmas Trips For Couples Ice Skating Quot De Quot Weihnachtsausfl Ge F R Paare Schlittschuh Fahren Quot [Uber En="Ice*skating*together*is*one*of*the*most*romantic*Christmas*trips*for*couples." De="Zusammen*Schlittschuh*zu*fahren*ist*einer*der*romantischsten*Weihnachtsausflüge*für*Paare."]](https://greatime.de/wp-content/uploads/2023/05/weihnachtsausfluege-fuer-paare-titelbild.jpg)