A baby is the perfect occasion to venture into a bigger craft project! My DIY felt baby mobile brings cheerful colours and a tropical feeling to your baby’s room. Find out how you can easily make it here.
It’s been years since I last sewed. Now that I’ve become a mum, it’s high time to change that and take up needle and thread again and make something special for my baby. The project: to make a DIY felt baby mobile that we can attach above the babybay or baby cot for baby fun and as an eye-catcher in the nursery.
Mobile comes from the French and means a lively, rotating or movable body. There are mobiles made of different materials and in different shapes, but what they all have in common is that the airy structures sway in the breeze and the individual components dance or fly. They hang freely in rooms and fascinate not only babies and children.
For this DIY felt baby mobile, I bought felt in great, bright colours and sewed flying colourful parrots, clouds, moon and leaves and delicate flowers out of it and made ponpons. This was the most work and I enjoyed it so much that I am already planning my next sewing project for my niece and nephew. Maybe it’s time to get out the sewing machine and start it up again :-).
I ordered the basic framework for the DIY felt baby mobile for a few euros from Amazon*. There you can also find basic frames for mobiles to hang above the cradle, on the ceiling or on the changing table! You can find all the materials you need to make the mobile on the material list!
There are even more cute animal craft ideas on Greatime! From fluffy pompom bunnies and pompom lambs to cute chicks made from starched wool.
Colourful DIY Felt Baby Mobile with Parrots in the Jungle
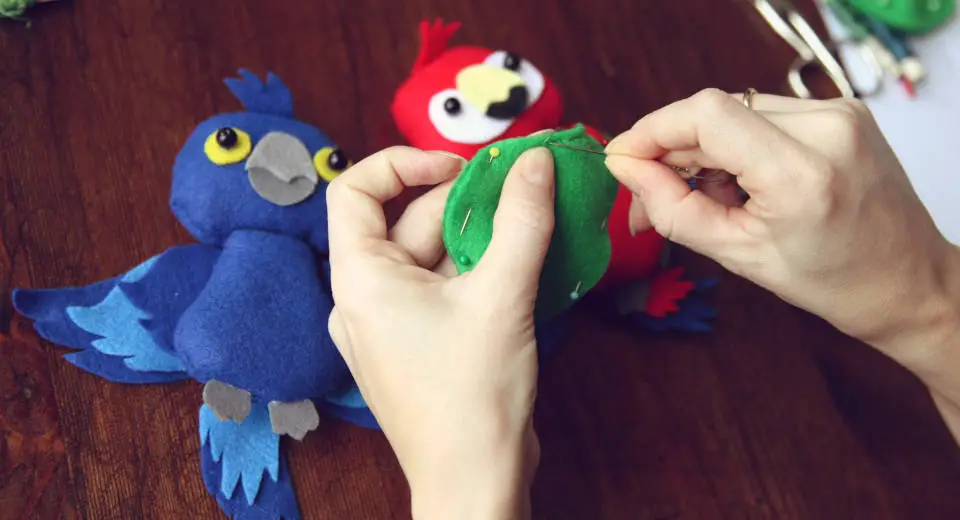
Are there more beautiful birds than parrots? Not for me. For this jungle mobile I sewed my favourite parrots, who cares that the hyacinth macaw is only found in Brazil and the magnificent cockatoo lives in Australia. 😀
You can find the templates for the parrots on the material list. The templates are marked with letters and numbers to make it easier to make the parrots with the help of the tutorial. If it says 2x on a template, it means that you need this template twice for each parrot. Some templates are only needed for a specific type of parrot as described in the step-by-step instructions.
A homemade mobile is a great gift idea for many occasions and a super nice decoration for a baby’s or child’s room. The materials you need are not expensive. The most precious thing in this mobile is creativity and time.
Material List*
- Basic framework for the DIY felt baby mobile
- Template 1 Parrots
- Template 2 leaves, moon and clouds
- Felt in many colourful colours, I used this felt set
- white wool
- Pompom maker
- Sewing needle and threads in matching colours
- Pins
- black acrylic beads
- fabric flowers
- cotton wool
- White baker’s twine
- Hot glue gun
- Ballpoint pen and white chalk pen
- Fabric scissors
How to Make the Felt Parrots
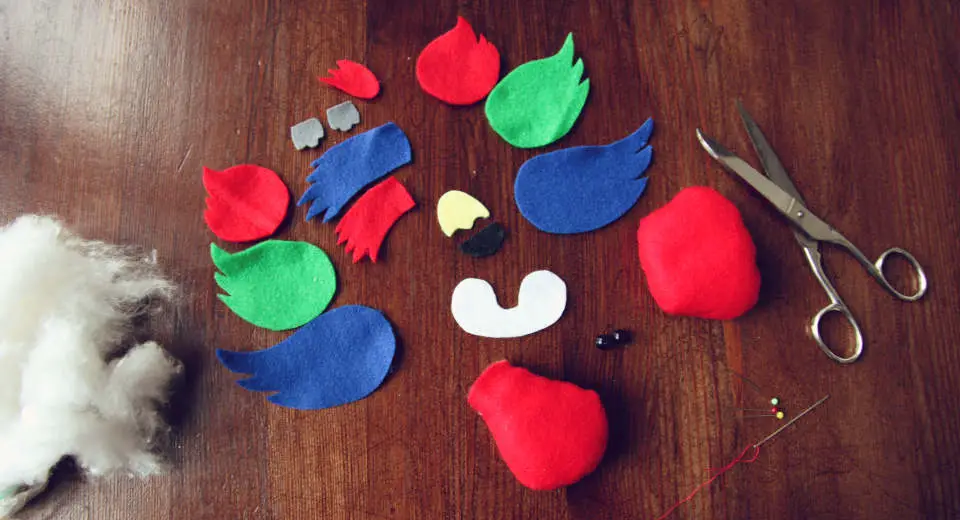
- Print and cut out the templates on the first sheet of templates
- Now get the felt ready in the matching colours, go around the templates as described below per parrot.
- Cut out all the felt pieces.
- Pin the 2 K-parts together with pins for the head and the 2 L-parts for the body. Save about 3 cm of the wider edge for the head and the narrow upper end when sewing together with matching yarn.
- Sew the head and body together with backstitch from right to left from the right side of the felt. To do this, push the needle through both layers of felt to the right of the outward stitch and back in close to the previous outward stitch. So you stitch with the needle backwards once and forwards twice.
- Turn the two sewn-together pieces of fabric inside out, stuff them with batting and sew the body and head shut.
- Glue the body and head together with the hot glue gun.
- Now glue S1 onto S2 for the tail and glue the outer wings F1 swinging outwards over it so that the upper end of the tail is covered by the butting wings. Now glue F2 and F3 onto F1 and finally the head and body onto the wings and tail.
- At the bottom centre, glue the parrot feet onto the seam with a thin line of hot glue.
- Glue the feather tuft slightly pointing to the right or left on the head and first the lower beak part S4, which is overlapped by S3.
- Finally, glue on the black acrylic eyes to the right and left of the beak.
Templates and Felt Needed for the 5 Parrots
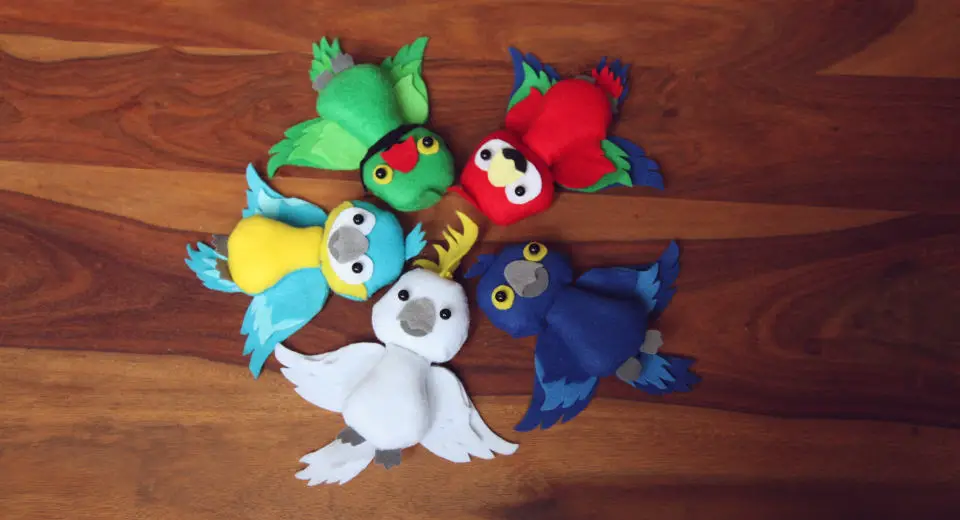
Light red macaw
Stencils needed: K, L, F1, F2, F3, S1, S2, S3, S4, K2, K3
Felt in the colours: red, green, dark blue, grey, light yellow, black, white
Glue the white “glasses” on the lower third of the head before you glue on the beak and eyes.
Hyacinth Macaw
Stencils needed: K, L, F1, F2, F3, S1, S2, S3, S4, K2, circles.
Felt in the colours: dark blue, medium blue, dark grey, light grey, yellow
Stick a yellow circle under each of the black acrylic eyes to the right and left of the beak.
Yellow-breasted macaw
Stencils needed: K, L, F1, F2, F3, S1, S2, S3, S4, K1, K2, K3
Felt in the colours: yellow, medium blue, light blue, dark grey, light grey, white
Before you sew the head together, glue the yellow felt strip K1 to one light blue side of the head K. The body is yellow on the front (L, 1 x yellow) and medium blue on the back (L, 1 x blue). Stick the white “glasses” on the lower third of the head.
Collared parakeet
Stencils needed: K, L, F1, F2, F3, S1, S2, S3, S4, K2, K5, circles.
Felt in the colours: medium green, light green, yellow, grey, red, black
Stick a yellow circle under each of the acrylic eyes and around the neck the black collar K5.
Cockatoo
Stencils needed: K, L, F1, F2, F3, S1, S2, S3, S4, K2, K4.
Felt in the colours: white, light grey, dark grey, yellow
Starting from the largest feather to the smallest, stick the headdress K4 centrally from front to back on the cockatoo’s head like a mohawk haircut.
Craft Moon, Clouds, Leaves and Flowers From Felt for the Mobile
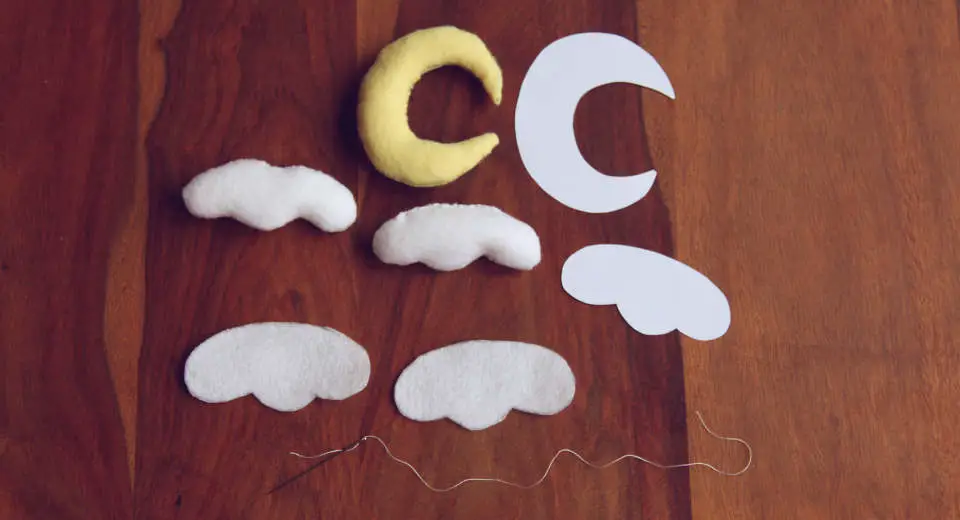
- Print and cut out the templates on the second page of the pattern
- Sew the crescent moon from 2 x M of light yellow felt, turn inside out and stuff with cotton wool.
- Sew a total of 3 clouds, each made from 2x W of white felt, which you turn inside out, stuff with cotton wool and sew together.
- For the jungle, cut 4x B1 from medium green felt and 4x B2 from light green felt for the leaves. Glue the smaller leaf onto the larger leaf with the hot glue gun and glue another fabric flower onto each leaf.

Stencils needed: M, W, B1, B2
Felt in the colours: medium green, light green, white, light yellow
Wrap Pompoms for Your DIY Felt Baby Mobile
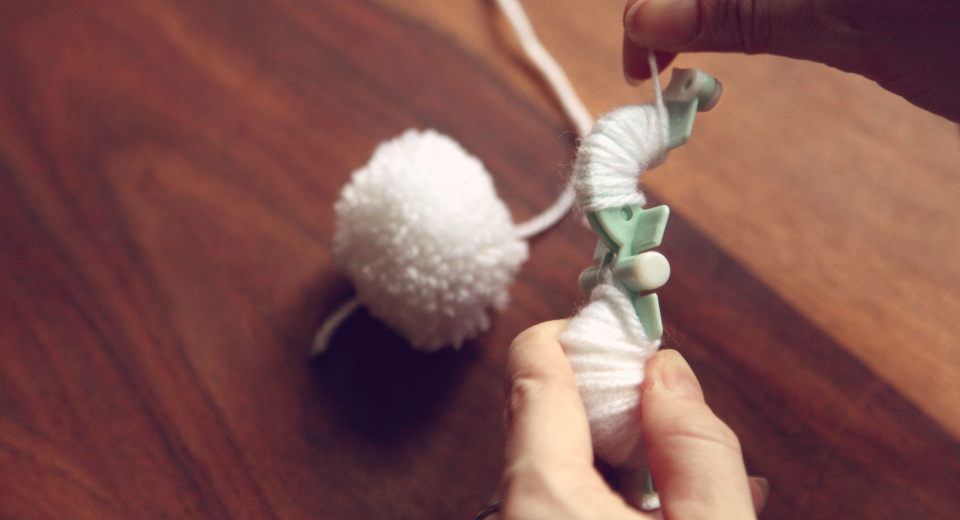
- Wrap white wool around the smallest pompom maker in the set (see materials list).
- Cut the wound wool, knot a woollen thread all around and trim the pompom into shape.
- Make a total of 3 pompoms this way.
- Important: Leave the 2 wool threads with which you tied the pompom hanging, you still need them to attach them to the mobile.
Equip the Base of the Baby Mobile
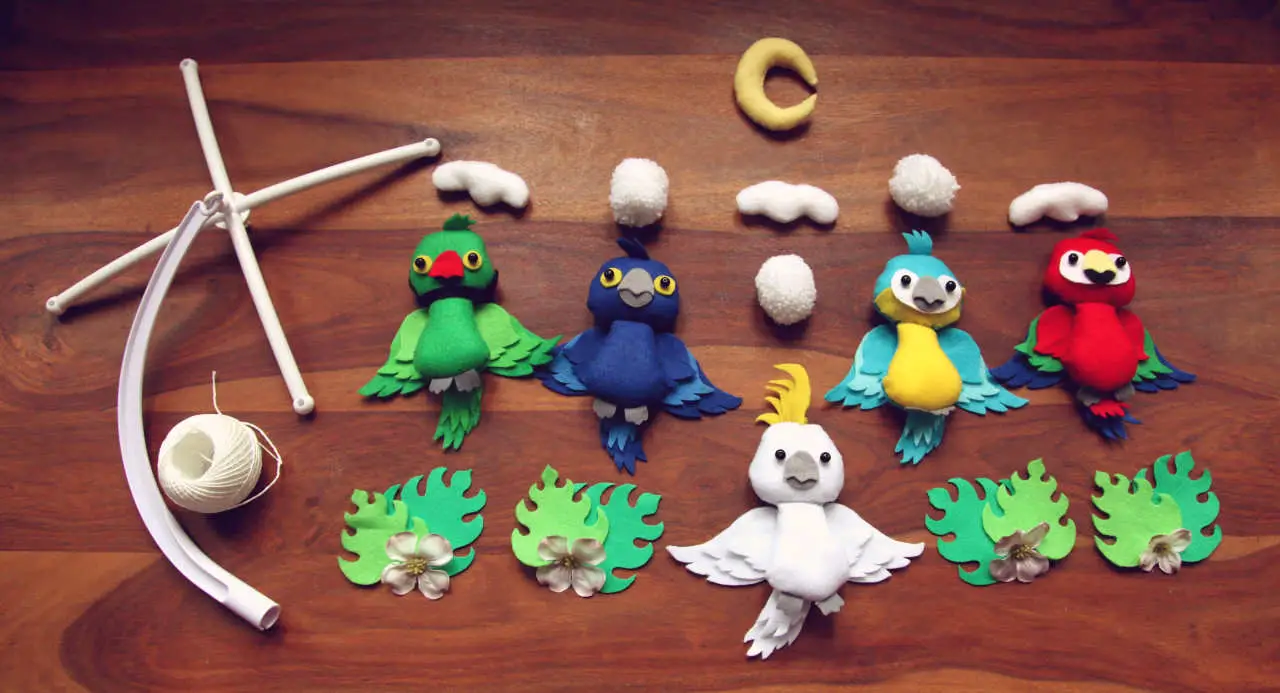
Depending on where you want to hang the DIY Baby Mobile, you will need a different basic frame. I used a basic frame with a clamp for hanging above the baby’s cot. But there are also basic frames to hang above the changing table or the baby cradle!
I used sturdy white baker’s twine for the strings to hang. You need 5 strings in total, the middle one is longer than the outer 4.
- Four outer strings with objects: Pierce with the needle through the leaves with flower and tie a knot in your favoured length to fix it at this point. Now tie a knot at equal intervals and pierce through a parrot. With two threads for the DIY Baby Mobile, poke through one cloud and knot a pompom at the same height on each of the other two.
- Middle thread: Attach the cockatoo at the bottom. Then knot the pompom at the overhanging ends of the wool at the height of the leaves and cut off the overhanging strings. Attach the cloud at the height of the 4 parrots flying around the outside and, at the very end, the crescent moon at the height of the pompoms and clouds all around.
- I simply poked the needle and thread several times through the recessed hole in the middle and on the bars of the basic frame, thus fixing it without knotting.
Have fun making your tropical DIY felt baby mobile!
Browse around and discover great ideas! On Greatime you will find beautiful crafting ideas with free instructions to make your own. And if you don’t feel like crafting, you’ll find lots of ideas for activities with kids, friends and your partner. No more boredom!
Do you like Greatime? Follow Greatime on Facebook and Instagram.
*There are affiliate links in this article. This means that if you buy a product through one of these links, Greatime will get a small commission. However, the product does not become more expensive and you support our blog in this way.

![Felt Baby Mobile With Cute Parrots How To Make It Tutorial [Uber En="Make*your*own*felt*baby*mobile*with*cute*animals" De="Baby*Mobile*selber*machen*aus*Filz*mit*süßen*Tieren"]](https://greatime.de/wp-content/uploads/2021/07/diy-baby-mobile-papageien-urwald.jpg)
![Uber En Quot Puzzle Advent Calendar Quot De Quot R Tsel Adventskalender Quot [Uber En="DIY*Puzzle*Advent*calendar*make*yourself*with*beautiful*puzzle*cards" De="Rätsel*Adventskalender*selber*machen*mit*schönen*Rätselkarten"]](https://greatime.de/wp-content/uploads/2023/11/raetsel-adventskalender-selber-machen-tutorial.jpg)
![Uber En Quot Coasters For Lanterns Quot De Quot Untersetzer F R Windlichter Quot [Uber En="How*to*make*wine*cork*coasters*for*candles*and*glasses" De="DIY*Untersetzer*aus*Korken*für*Kerzen*und*Gläser"]](https://greatime.de/wp-content/uploads/2021/11/untersetzer-aus-korken-basteln-diy.jpg)
![Uber En Quot Sealing An Envelope Quot De Quot Briefumschlag Versiegeln Quot [Uber En="Make*an*envelope*and*seal*it*with*a*seal*and*wax." De="Briefumschlag*basteln*und*gestalten*sowie*am*Schluß*mit*Siegel*und*Wachs*verschließen"]](https://greatime.de/wp-content/uploads/2020/07/briefumschlag-basteln-gestalten-siegelwachs.jpg)