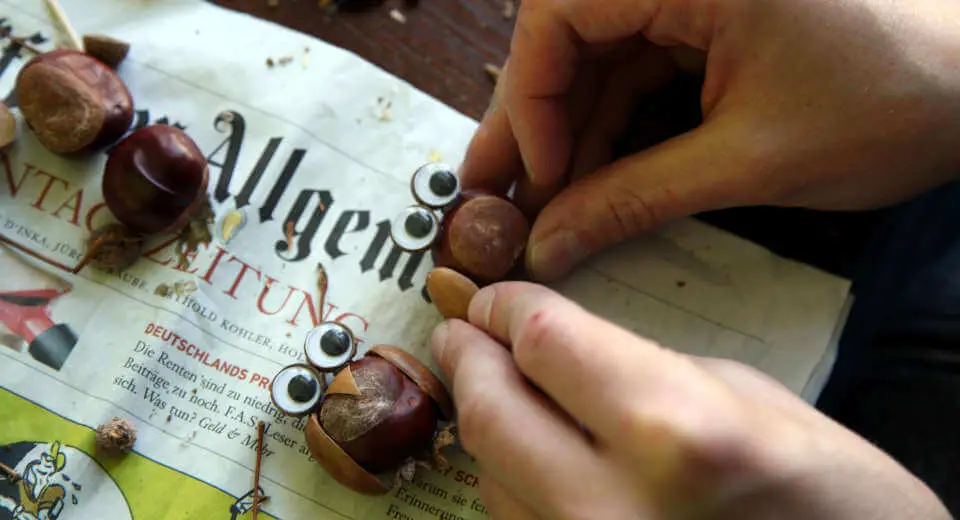
These chestnut owls are super easy to make and are cute and decorative at the same time. Here’s how to make it!
Autumn is here! Colourful leaves adorn the trees and some are now dropping their fruit, which you can use wonderfully for crafting!
Of course, I’m talking about chestnuts and acorns here. Even toddlers find the nut-hard things interesting, just make sure you teach them early on that not all chestnuts are suitable for eating.
Acorns are only suitable for pigs to eat raw. Find out here what to look for when collecting chestnuts and how to tell sweet chestnuts from horse chestnuts.
While crafting with chestnuts and acorns can be made as complex as you like for adult crafting professionals, there are also simple instructions that are wonderful for autumn crafting with children. Like these cute little chestnut owls!
This Is What You Need* For These Chestnut Owls
- Horse chestnuts
- Acorns (with cap)
- Plastic eyes for crafting (circular, diameter: 12 mm)*
- Kitchen scissors and Craft scissors
- All-purpose glue or Hot glue gun
- Possibly cardboard paper (thick, black or brown)
How to Craft Chestnut Owls
1. Select Chestnuts and Acorns and Work the Acorn Shell
For each of the chestnut owls you will need 1 chestnut, at least 1 acorn (fruiting body) and 3 acorn caps. The chestnut forms the body of the owl, it is best to choose a particularly nice and round shaped one for this.
Carefully cut the acorn body into two equal halves with kitchen scissors. These are best suited for this purpose. For further processing, it is better to use finer craft or paper scissors.
Ideally, you can now easily peel off the shell of the acorn. If not, try again with another acorn. Otherwise, scrape out the pith with a pointed object until you really only have the shells.
If you now have 2 half acorn shells, cut off a strip of the same size lengthwise with a pair of scissors so that you have 2 wings left for your chestnut owl.
If possible, cut out a triangular beak from the remains of the acorn shell with the scissors. Otherwise, peel another acorn for it.
By the way, we have tried out 2 variants of the beak, one lying flat on the owl’s head (1 triangle), the other protruding plastically (2 triangles, one slightly larger).
2. Select and Edit Acorn Hats
Now select 2 particularly nice, round acorn hats for the owl’s eye sockets. Make sure that your plastic eyes fit into them, so use large ones. You can then glue the plastic eyes into the eye sockets with all-purpose glue or a hot glue gun and let them dry. (The glue gun is super fast).
Cut a third acorn hat into two halves with the scissors and cut two sharp points into each one to make little owl feet. This is the most difficult step because the acorn caps break easily. Children may need adult help here.

There is not much more to say about this, except: follow the pictures and your own gut feeling.
A tip for gluing the wings: it is better to glue them to the end at the top, where the acorn had its more pointed end.
In our version of the chestnut owls, they cannot stand on their own feet. We added a satin ribbon to hang them up. Alternatively, you can cut out a small piece of black or brown cardboard as a stand and glue each of the chestnut owls to it so that they stand upright.
Have fun making them!
There are even more simple crafting ideas with complete instructions on our leisure ideas portal! All year round, browse Greatime for original ideas for gifts and activities with kids, friends and your partner. Take a look!
Do you like the ideas from Greatime? Then keep up to date by following us on Facebook and Instagram and subscribing to our newsletter.
*This article contains affiliate links. This means that if you order products through it, we receive a small commission. However, this does not change the price of the product.

![Chestnut Owls How To Make The Cute Autumn Crafts Tutorial [Uber En="Chestnut*owls*are*a*nice*idea*for*autumn*crafts*with*children" De="Kastanien-Eulen*sind*eine*schöne*Idee*für*das*Herbtsbasteln*mit*Kindern"]](https://greatime.de/wp-content/uploads/2018/10/kastanien-eulen-1.jpg)
![Uber En Quot Book Gift Idea Quot De Quot Fantasievoller Buchgutschein Quot [Uber En="Book*gift*idea*as*a*diy*voucher*in*envelope" De="Buchgutschein*im*Kuvert"]](https://greatime.de/wp-content/uploads/2020/04/buchgutschein-basteln-mit-vorlage.jpg)
![Uber En Quot Christmas Decoration Quot De Quot Weihnachtsdeko Quot [Uber En="3d*poinsettia*and*3d*christmas*tree*as*modelling*clay*christmas*decoration*made*with*step*by*step*instructions" De="3d*Weihnachtsstern*und*3D*Christbaum*als*Weihnachtsdeko*aus*Modelliermasse*mit*der*Schritt*für*Schritt*Anleitung*nachbasteln"]](https://greatime.de/wp-content/uploads/2021/11/diy-weihnachtsdeko-aus-modelliermasse-sterne-tannenbaeume.jpg)
![Uber En Quot Diy Birth Card Quot De Quot Diy Karte Zur Geburt Quot [Uber En="DIY*Congrats*newborn*baby*boy*card*tutorial" De="DIY*Karte*zur*Geburt*eines*Jungen*basteln"]](https://greatime.de/wp-content/uploads/2022/03/diy-karte-zur-geburt-junge-stempel.jpg)